Showing posts with label gifts. Show all posts

Monday, February 15, 2010

Sewing with Kids - part 1

Santa gave my 7 y-o a sewing machine. While Grandma (my mother-in-law) was here during the holidays, we made some time to sew with her! They made a girly cover for my daughter's boring computer chair. She did an awesome job and actually did a lot of it herself. She learned how to make a casing for elastic. The fabric we used was just from a pink sheet we bought at Ikea for $2.


BEFORE


AFTER


Friday, December 18, 2009

Christmas Zig-Zag Quilt, Done and Gone

I wish I had more time to write about this. But I'm just too busy today!

Just pictures for now. Maybe I'll get around to writing about it soon...


Tuesday, December 15, 2009

Almost done!

I'm working on the last step - binding! I hope to be able to show you "finished" pictures tomorrow.

Friday, November 20, 2009

Scotcheroos


Guess what? I was featured on Little Birdie Secrets for their virtual cookie exchange! I feel so honored. Thanks, Little Birdies! All the other cookies look delicious, too. I am grateful for some new recipes to try this holiday season. Can't wait to try them!

Here's my recipe for Scotcheroos:

Ingredients:

1 1/2 C. creamy peanut butter
1 C. light corn syrup

1 C
. sugar
6 C. rice krispies cereal

1 2/3 C. butterscotch chips*

1 C. sem
i-sweet chocolate chips*

*(You can adjust the amounts of the chocolate and butterscotch chips to your liking. For example, if you
aren't a big fan of butterscotch these are still good when you switch the measurements of the chocolate and butterscotch.)

Coat a 9x13 pan with non-stick cooking spray. Combine peanut butter, sug
ar, and corn syrup in a large saucepan. Cook over medium-low heat, stirring frequently, until melted. Remove from heat. Add cereal and stir until thoroughly coated. Press onto bottom of prepared baking pan. Microwave the butterscotch chips and semi-sweet chocolate chips together in a large microwaveable bowl on HIGH power for 1 minute. Stir. Microwave at additional 10-20 second intervals, stirring until smooth. Spread over cereal mixture. Refrigerate for 15-20 minutes or until topping is firm. Cut into squares and then triangles if desired. Makes approx. 20 bars or 40 triangles. Optional (and pictured): Melt additional dark chocolate chips and/or butterscotch and/or white chocolate, separately, about 1/4 cup each. Use spoon to drizzle stripes back and forth on the pan, with each variety. (I usually only use two different kinds.) Refrigerate again to let the chocolate harden. The scotcheroos pictured are with dark chocolate and butterscotch drizzled on top. I like the look of it better than plain, if I am taking to a party or giving as a gift. When I make them just for my family I completely skip the drizzled chocolate on top. It's yummy either way.


Peanut butter (I used crunchy), sugar, and corn syrup melting together in the pot.

The rice krispies mixed with peanut butter mixture, pressed into the greased pan. They're actually really good just like that. If you're pressed for time or short on chocolate and butterscotch, just serve these. Just warn people that they have peanuts in them... they aren't regular rice krispie treats.

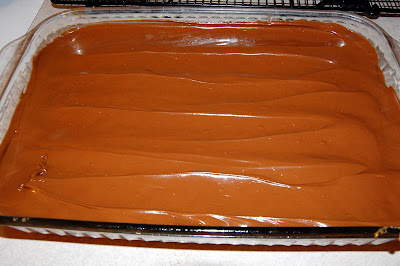
Topped with chocolate butterscotch mixture. Great just like that, too.

Just with butterscotch spoon drizzled. (It's a lame job of drizzling and ugly picture, I admit.)

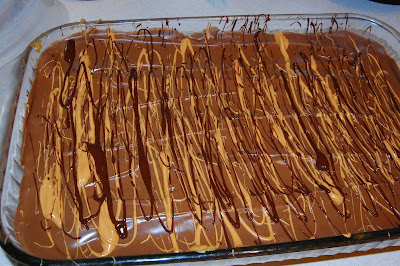
Dark chocolate and butterscotch drizzled on top. It looks really good (and tastes good too) with white chocolate drizzled, too. (Though, not really in addition to. That would be a bit much!)

YUM!
... And super easy. I usually cut them smaller than this picture shows. I would cut them in half. They're more bite size that way. (I don't feel as bad about eating them, then.) :-)

Wednesday, November 18, 2009

Giveaways!!


Sorry if I fooled you with that title. I'm not hosting a giveaway. But, V and Co. is!! Go check it out and leave a comment for a chance to win! These things are gorgeous! If you don't have a camera with a strap like that, you could probably think of someone who would like it for Christmas.

Go check out *Shey*[B]'s etsy shop for all of her choices. Honestly, they are gorgeous! (I made one awhile back, for my camera, and it's okay, but nothing compared to hers!)


Okay, here's another one. The Burnt Daisy is having a giveaway. She has an adorable blog and makes beautiful decorative letters. Check out her "Believe" giveaway.


Good luck!!

Wednesday, November 4, 2009

Spare time = quilting. Now I just need to find "Spare Time"!

Seriously! Do you remember me talking about wanting to make a Christmas quilt for my husband's boss' family? Well, Christmas is right around the corner and all I've done so far is order the fabric and wash it. It's been patiently waiting there on the shelf, for weeks, to be cut and pieced! I was just waiting for all of the craziness of October to end (not really on purpose. I just never found "Spare Time"). I guess I did think to myself that the beginning of November will be less busy and I'd find the time!

We're in NOVEMBER! It doesn't look good for me and that quilt!! I need a whole Saturday to myself, my cutting tools, and my machine! I don't see that happening this month though.

Enough rambling. Sorry.

I bought Moda's Figgy Pudding for the fabric...


and I want to do a zigzag quilt similar to these:

(found here at Film in the Fridge)
{I'm seriously loving her blog. I just found it. She inspiring in the quilting department. Very talented!}

(found here at A Quilt is Nice)
{Also a very talented quilter. I've learned a lot from her blog. She has beautiful stuff.}

I really hope it doesn't take me too long to make this quilt. I hope to be able to show you some pictures of progress very soon! And, if you see Spare Time can you tell him to stop by my house, please?! I need him!

P.S. Did you notice I was successful with my posting of pictures from other sites?? Yay! Thanks for your help. :-)

Wednesday, October 21, 2009

My Christmas Wish List

Yeah, I know... we still have two months until Christmas. But, I have some things I've been wanting. So, why not wait until Christmas, huh?! Here are some things I'm hoping for: (Santa, are you reading this??)


  1. new running shoes
  2. a grain mill/wheat grinder
  3. a water bottle belt (may look like a "fanny pack") - I hope I can last that long. My long runs may get too long before Christmas to wait...
  4. ChiRunning (my own copy!)
  5. Dave Ramsey books for kids

There will likely be some changes to this list in the next few months, but it's a good start!

What's your wish list??

Sunday, October 11, 2009

Quilt Finally Finished


Friday night I finally finished this baby quilt that I have been working on for two months! I don't have as much time to quilt as I'd like. This is what the package looked like, folded together with the bow, when I delivered it to my friends. Sorry for so many pictures. My husband and I took quite the photo shoot of this quilt. It was actually quite hard to want to give away. I fell in love with it as I was finishing it up. Once I got to their house, it was so fun and easy to give to them... and their baby is SOO cute!!

So much blood, sweat and tears went into this thing. I LOVE this quilt. {Probably because I spent so much time with it!}

Front of the quilt.

Back of the quilt.

Doll quilt on top of baby quilt.

Doll quilt label with baby quilt label. (Some names were smudged in photoshop). Thanks, Amy, for printing these out. Thanks, Grant, for designing the labels (with my initial ideas, of course). You guys are the best!

Baby quilt label.

This is the first time I've made a quilt label. It was harder than I thought. If I had originally bought and used the right kind of printable fabric, then it would've saved me a lot of time and effort (and Amy's ink). If you ever want to use them, make sure you get the "colorfast" printable fabric sheets, instead of the kind that you have to "dry clean only". What good is that on a baby quilt??

Doll quilt label (back of quilt) on top of the front of the baby quilt. I posted this one only because I really liked the detail and the colors.


This is the two of the quilts folded together, again, just turned around. I really like the look of all that quilted-ness, binding, crinklieness together. That's all.

Now I have to make a couple more, similar to this... but twin size, for MY girls. I have quite a bit of the fabric left over (did that on purpose). My 6-y-o daughter kept adoring the quilt as I was making it. She kept asking me to make one for her, like it. My 1-y-o daughter would take it, lay it out on the floor and lay down on it, whenever she saw it. We grew quite attached to it. Glad a beautiful little girl can enjoy this quilt and the doll quilt, when she's old enough to carry her own babies around.

Now it's on to the next quilting project...

Wednesday, September 23, 2009

Pie in a Jar


Ever since I saw this post on Little Birdie Secrets, I've wanted to try making these scrumptious little treats. I just love personal sized treats. Whenever there is pie around I feel like I eat too much or there is too much left over. This is just great as a small gift when visiting a friend for the day or as a little pick-me-up.

This really was way easier than I thought. Everything went REALLY fast. I made some this morning and gave it away to a friend around 10am. I felt a little funny about giving it away because I technically haven't tried baking it. I told my friend that I hadn't tried it yet and she said she'd let me know how it turned out. If I really wanted I could just bake one of the two I have left in my freezer. But, those are already intended for some special friends.

(I had the crust up over the top of the jar so I could make sure I had enough to squish the top crust with it. It worked well and there was a little left over.)

The crust recipe I used was from an old church cookbook. The recipe was titled "Best Ever Pie Crust". I figured with a title like that, I couldn't go wrong!

2 cups flour
1 cup crisco
1 Tablespoon sugar

1/2 teaspoon salt
1/2 cup milk

Cream 1 cup flour with the crisco. Add remaining flour and dry ingredients. Stir in milk. May use spoon or electric mixer. Roll out for double pie crust or 2 single pie crusts. For baked shell, fill unbaked crust with uncooked pinto beans. Bake at 450* for 15 minutes. Gently spoon out beans.

{Of course I disregarded the second half of the instructions, while making the pie in a jar.}


For the filling I just peeled 2 medium sized fresh peaches and cut them up in small pieces. I added some sugar (didn't measure - but I guess it was about 1 1/2 Tablespoons). I added about a teaspoon of cinnamon and 1/4 teaspoon of nutmeg. I also added about 1 Tablespoon of flour to thicken the juice.

This yielded about 3, half pint jars of pie filling. I still have some pie crust dough leftover. So, I think I may whip up some more tomorrow. {... if I can find any more of my little jars.}

I also found a great post about this on Not Martha.